
Set Up Your Website
Turn FabWise into your public storefront. A polished shop listing, a quote request form that drops leads into your inbox, and an optional careers page — all hosted by FabWise, no separate website to maintain.
Why it matters
Customers find shops by searching online, asking around, or being referred. When they find you, they need to know three things fast: what you can make, whether you're a fit for their project, and how to ask for a quote.
The Website is a public page on fabwise.app that answers all three. It lives at fabwise.app/shop/your-shop-name, looks like a real shop website, and feeds every quote request straight into your FabWise Leads inbox.
You can run it as your only web presence, or you can use it alongside your existing website to handle inbound quote requests.
Setup takes about 30 minutes if you have your photos and capabilities list ready.
What you get
- A public listing at
fabwise.app/shop/your-slugwith your logo, tagline, photos, capabilities, hours, and social links - A Request a Quote form on the listing that creates a Lead in your admin Leads inbox
- An optional Careers page at
fabwise.app/shop/your-slug/careerswhere you post jobs and collect applications - A URL you can share — Google Business Profile, email signature, business cards, social posts
Your logo and brand color come from Company Settings (they're shared across your whole FabWise account). Everything else — tagline, photos, capabilities, hours — is website-specific and configured here.
What you'll need before you start
- A short tagline (one sentence describing your shop)
- A paragraph or two of description
- 4–8 photos of your shop, work, equipment, or team
- Your capabilities list (welding, CNC, sheet metal, etc.)
- Materials you work with (steel, aluminum, etc.)
- Industries you serve (aerospace, automotive, medical, etc.)
- Certifications, if any (ISO 9001, AS9100, AWS, etc.)
- Business hours
- Social media URLs, if you have them
If you don't have all of this ready, you can still set up a basic website in 5 minutes (steps 1–4) and fill in the rest later.
Step 1. Open the Website admin
- Sign in to admin.fabwise.app as an account owner.
Click Website in the left navigation. (It's a top-level item — not under Settings.)
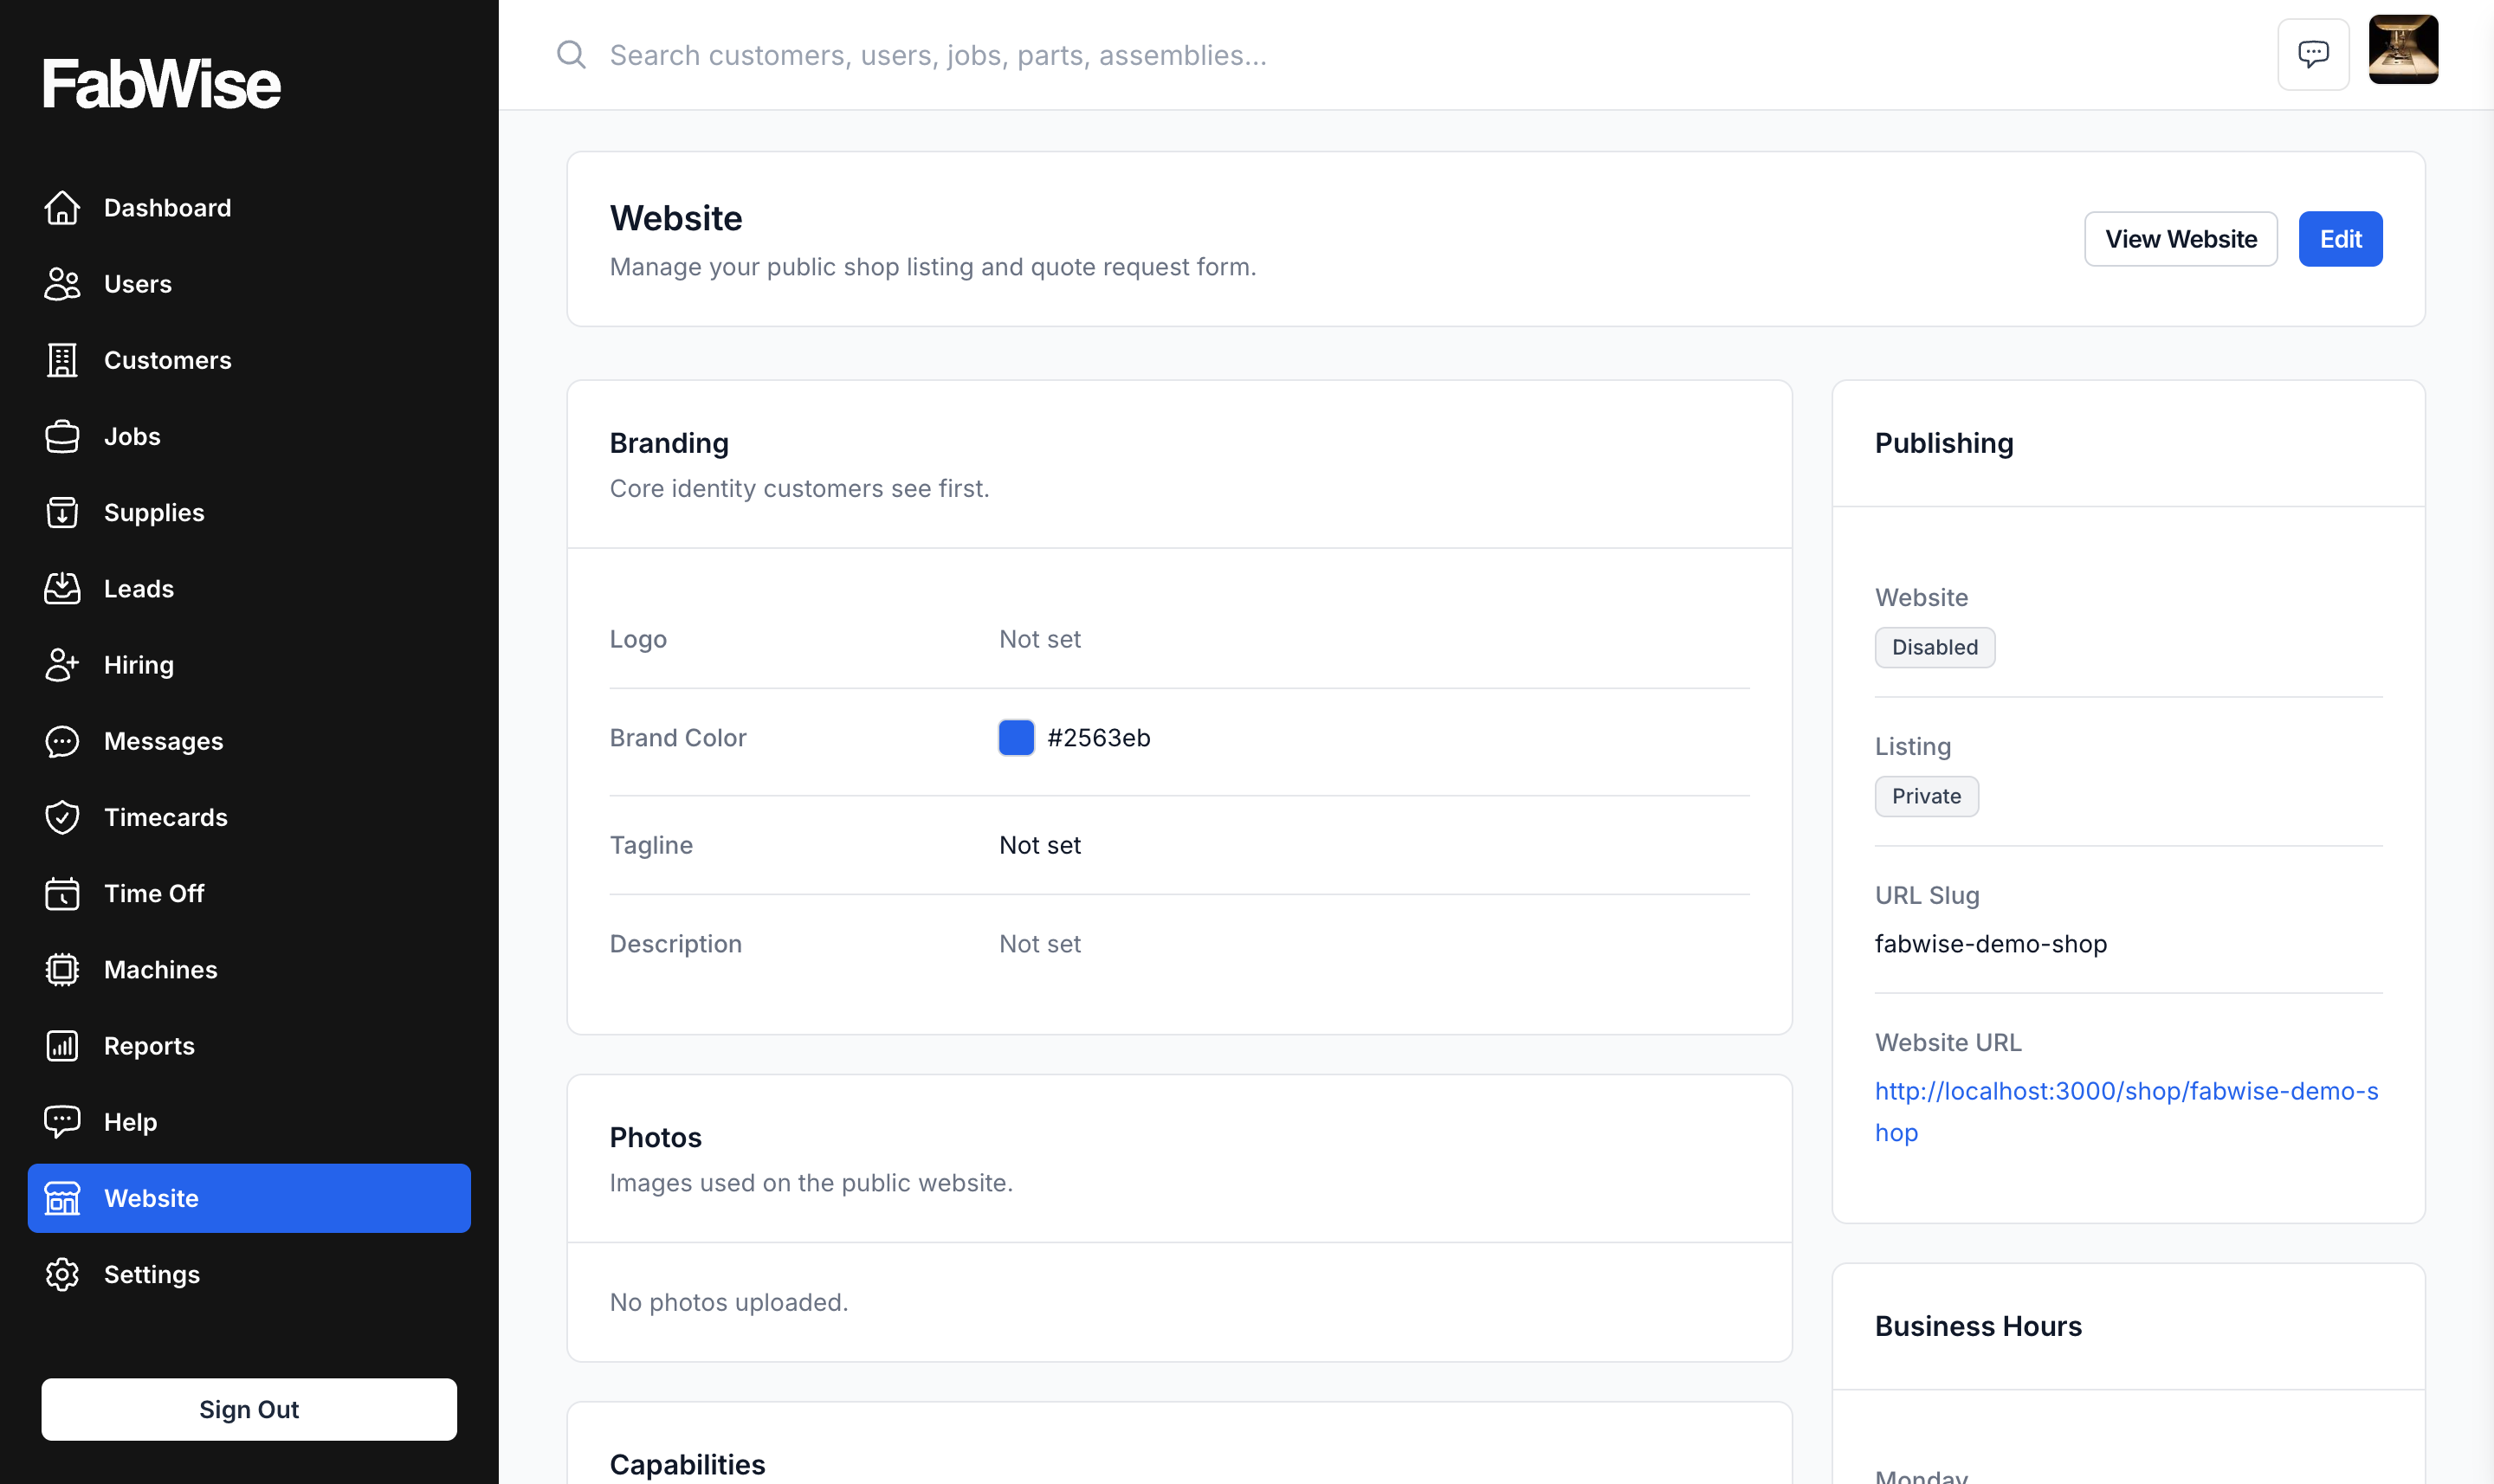
Click Edit in the top right.
You're now in the website editor. Changes save when you click Save; the Cancel button discards anything you haven't saved.
Step 2. Choose your website URL
The website URL is fabwise.app/shop/your-slug. The slug is the part you control.
- In the Publishing card, find Website URL Slug.
- Type a short, readable slug. Use lowercase letters, numbers, and hyphens — no spaces or special characters. Examples:
acme-metalworks,northsidefab,precision-shop-123. - Click Save.
Pick something you can say out loud. "Go to fabwise dot app slash shop slash acme-metalworks" is easier than "fabwise dot app slash shop slash a-c-m-e-underscore-metal-w-o-r-k-s." Slugs can be changed later, but every time you change them, every link you've shared stops working — pick one you're willing to live with.
Step 3. Fill in branding
The Branding card has two fields:
- Tagline — one sentence customers see at the top of your website. Examples: "Custom metal fabrication and welding since 1985." "Precision CNC machining for aerospace and defense." "Family-owned sheet metal shop serving Atlanta for three generations."
- Description — a paragraph or two. Tell customers what makes your shop different. Quality, experience, equipment, response time, geography — pick the two or three things you want them to remember.
Your logo and brand color show up automatically — those come from Company Settings. If you haven't set them yet, do that first: Admin → Settings → Company.
Pick a look
Three themes ship with every website, and the live preview below updates the moment you pick one — nothing is published until you Save.
- Industrial — a bold, dark hero with your shop photos front and centre. The default, and what most fab shops want.
- Modern — light, airy and clean, with a lot of white space.
- Classic — a denser, bordered "spec sheet" style with traditional serif headings.
Your brand colour carries through all three automatically. Set it once in Company settings and the whole site re-colours to match, with readable buttons and accents on any colour you pick.
Show your credibility
Buyers decide fast, and the Credibility card holds the things that earn their trust:
- How we work — a short description of your process from quote to delivery, so a serious buyer knows you're a fit before they call.
- Typical lead time — a capacity signal, like "4–6 weeks typical."
- Testimonials — customer quotes with a name, company, and an optional logo. + Add testimonial for each.
- Case studies — past projects with a title, a short summary, and a photo.
Certifications you enter in the Capabilities card appear automatically as a trust strip near the top of the site.
You don't lay any of this out. Fill in the fields, pick a look, and FabWise builds the page.
Step 4. Add photos
Photos sell. A website with no photos looks abandoned.
- In the Photos card, click Choose Files.
- Select 4–8 images. Each should be a JPEG or PNG, ideally 1200 pixels wide or larger.
What to photograph:
- Your shop floor with equipment visible
- Recent finished work, especially impressive or visually distinctive pieces
- Your team at work (with permission)
- The front of your building, if it's well-marked
- A close-up of a clean weld or precision cut
Avoid: blurry phone snapshots, photos of empty floors, anything taken with a flash. If you don't have photos yet, a decent smartphone in good lighting beats nothing.
Step 5. Set capabilities, materials, industries, and certifications
The Capabilities card has four checklists. Customers use these to filter shops, and search engines use them to match your website to relevant searches.
Be honest. Don't check every box — check only what you actually do regularly and do well.
- Capabilities: services you offer (Welding, CNC Machining, Sheet Metal, Laser Cutting, Plasma, Waterjet, Bending, Rolling, Powder Coating, Assembly, Prototyping, Production Runs)
- Materials: what you work with (Steel, Stainless Steel, Aluminum, Brass, Copper, Titanium, Plastic, Carbon Fiber)
- Industries Served: which industries you regularly take work from (Aerospace, Automotive, Construction, Energy, Medical, Marine, Manufacturing, Agriculture, Defense, Food & Beverage)
- Certifications: quality standards you hold (ISO 9001, AS9100, ISO 13485, AWS Certified, ASME Certified, NADCAP, ITAR Registered)
Don't check certifications you don't actually hold. Customers ask for proof on first contact, and getting caught padding a list ends conversations.
Step 6. Add business hours
The Business Hours card has a row per day of the week.
For each day:
- Open / Close: set your hours.
- Closed: check this if you're not open at all that day.
- By Appt: check this if customers need to schedule before coming in.
Customers see your hours on the website listing. If you don't list hours, your website looks less credible — fill them in.
Step 7. Social links (optional)
If you have a Facebook, Instagram, LinkedIn, or YouTube presence, paste the URLs in the Social Links card. Each one shows up as an icon on your website. Leave blank what you don't have — empty entries don't show.
A shop with a few good Instagram posts of recent work often gets more inbound interest than a shop with a polished website. If you've been posting work to social, link it.
Step 8. Search settings (optional)
The Search card controls how your website shows up in Google and other search engines.
- Meta Description: a one-to-two sentence summary search engines display under your website in results. Defaults to your description if blank. Write something different here if you want a punchier search snippet.
- Keywords: comma-separated phrases customers might search for. Examples: "metal fabrication, welding, custom parts, Atlanta." Mainly useful for our internal shop directory — Google itself mostly ignores keyword meta tags.
If you're not sure what to put here, leave it blank. Your tagline, description, and capabilities give search engines plenty to work with.
Step 9. Publishing — choose what's live
The Publishing card has three toggles. Each one is independent.
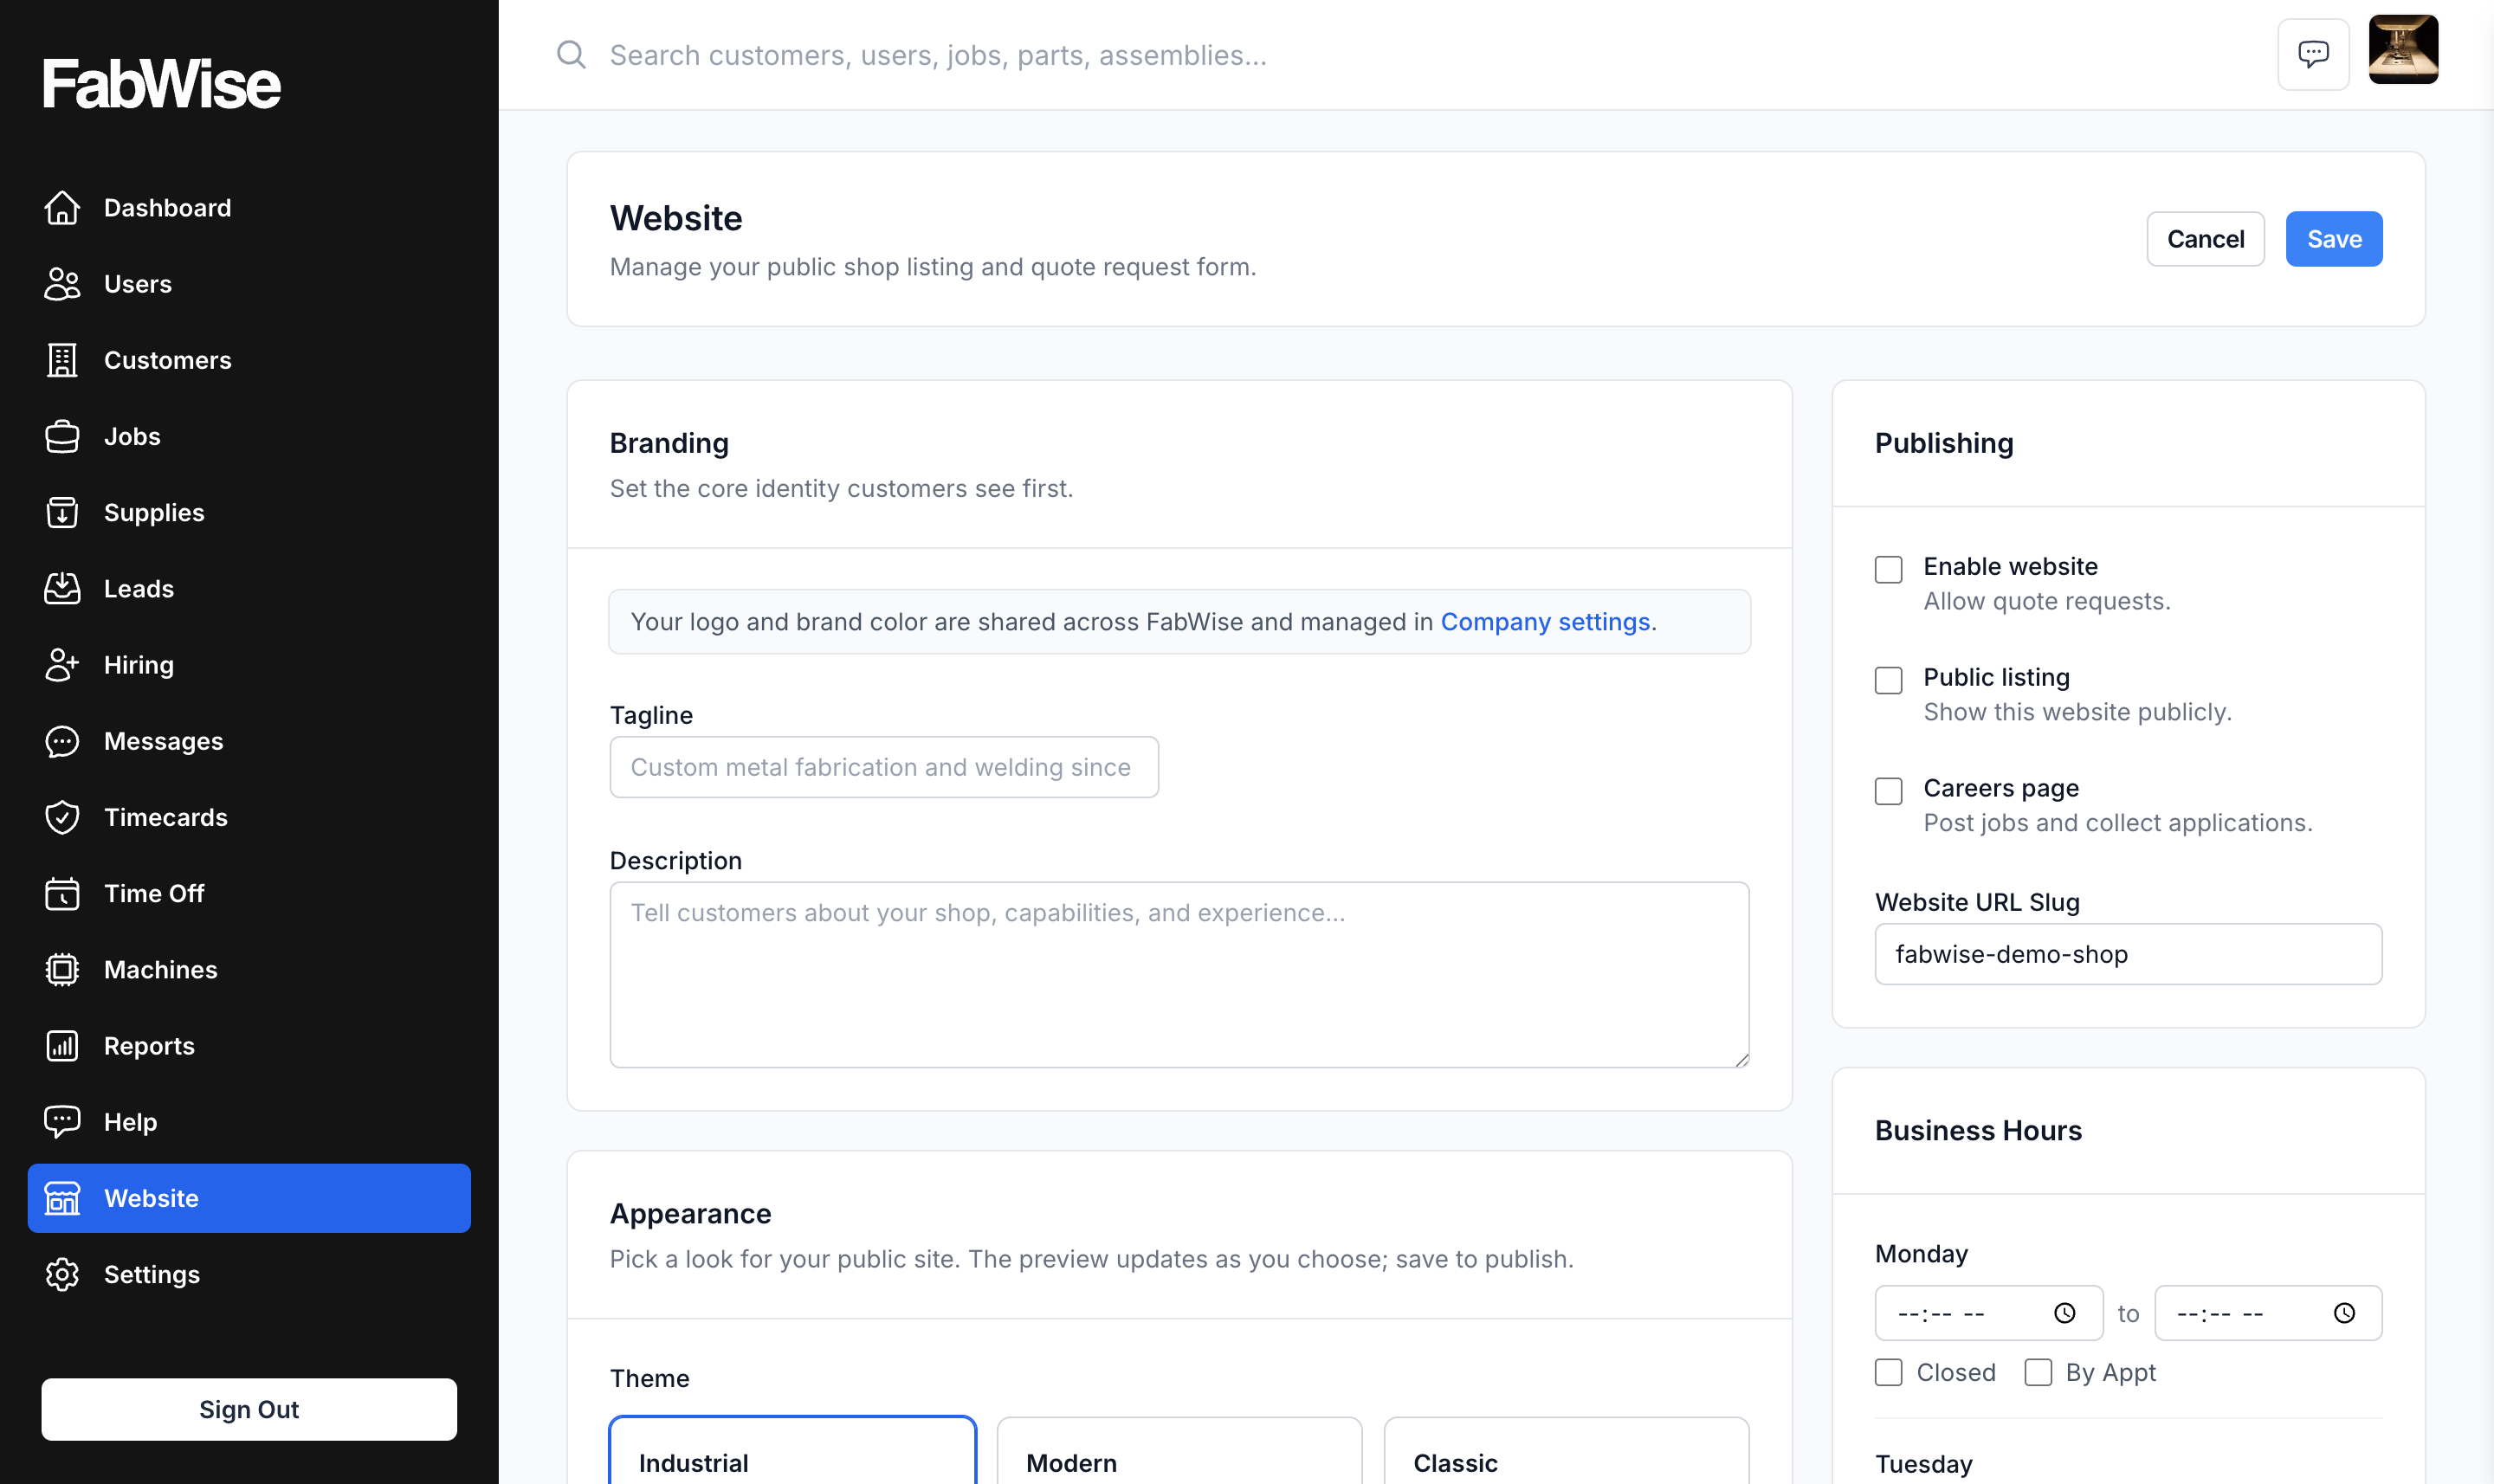
- Enable website — turn on the quote request form. Anyone with the URL can request a quote. You need this on for the website to do anything useful.
- Public listing — list your website in the FabWise shop directory. Other people can find you by searching capabilities, industries, or location. Turn this off if you only want to share the URL privately.
- Careers page — publish a public careers page at
/shop/your-slug/careersand let people apply to jobs you post. See the Careers Setup help article for the full job-posting flow.
The most common combinations:
| What you want | Enable website | Public listing | Careers page |
|---|---|---|---|
| Full public storefront | ✓ | ✓ | optional |
| Private quote form for existing customers only | ✓ | ✗ | ✗ |
| Quietly take applications, no public listing | ✗ | ✗ | ✓ |
| Set up but not yet ready | ✗ | ✗ | ✗ |
If Public listing is on but Enable website is off, FabWise warns you — a website that's listed publicly but can't accept quote requests is a confusing experience.
Click Save when you're done.
Step 10. Preview your website
After saving, click View Website at the top of the page. Your website opens in a new tab at fabwise.app/shop/your-slug.
Walk through it as if you were a customer who'd never heard of your shop:
- Does the tagline and first photo make me want to keep reading?
- Can I tell what you make from the first screen?
- Are the capabilities I care about listed?
- Is the Request a Quote button obvious?
If any of those is no, go back to the editor and tighten it.
Where leads land
When a customer submits the quote request form on your website, FabWise creates a Lead in your account. To see incoming leads:
- Go to Admin → Leads.
- New leads are at the top of the list.
- Click a lead to see the customer's contact info, project description, and any files they uploaded.
Leads include:
- Customer name, email, phone
- Company (if provided)
- Project description (free text)
- File attachments (drawings, photos, spec sheets — if uploaded)
You can mark a lead as Accepted (you're going to quote it) or Rejected (not a fit). Accepted leads turn into Customer and Job records you can then track inside FabWise.
For the full lead-management workflow, see the Managing Leads help article.
Sharing your website URL
Once your website is live, share the URL everywhere customers find shops:
- Email signature — put
Request a quote: fabwise.app/shop/your-slugunder your name - Google Business Profile — set the website URL as your website
- Business cards — print the short website URL, not your long contact info
- Social media bios — link to your website as your "website"
- Existing website — if you keep one, put a "Request a Quote" button that links to
/shop/your-slug/quote - Vendor directories, trade association listings, industry referral sites — same pattern; your website URL is the canonical link
If you change your slug later, every link you've shared breaks. Pick a slug you can live with and don't change it casually.
Pointing a domain you already own at it
Plenty of shops own a domain they've never done much with — bought years ago, parked at a registrar, pointing at nothing or at a page somebody built once.
You can send it here. At your domain registrar — wherever you bought the name — look for forwarding, redirect, or URL forwarding, and point the domain at your website address:
https://fabwise.app/shop/your-slug
Someone typing your domain lands on your FabWise site. The address bar shows the FabWise URL after the redirect, because the site is hosted here — the domain is a signpost pointing at it, not a second home for it.
Two things to know before you do it:
- You set this up at your registrar, not in FabWise. Every registrar words it differently, and their support can tell you where the setting lives.
- Don't point a domain that already runs a website you rely on. Forwarding replaces whatever that domain currently serves.
If you want your website served at your own domain, with your name in the address bar the whole time, that isn't something FabWise does today.
Tips for a website that actually wins work
- Keep the tagline boringly specific. "Custom metal fabrication for the Atlanta area" beats "Excellence in manufacturing solutions."
- Photos matter more than copy. A shop with eight photos of recent work beats a shop with a great paragraph and no images.
- Update photos quarterly. A website that hasn't changed in two years signals a shop that hasn't either.
- Don't list every capability — list your real ones. A shop that claims twelve capabilities looks less credible than a shop that focuses on four it does well.
- List hours and answer the phone during them. A lead that submits a quote request and doesn't hear back in 24 hours assumes you're not interested.
Troubleshooting
My website URL goes to a "Not found" page
Two possibilities. First, check that Public listing is on — a website with public listing off isn't reachable at the public URL. Second, check that your Website URL Slug is filled in — without a slug, there's no URL at all.
I changed my slug and old links don't work anymore
This is expected. Slug changes don't redirect old URLs. Update wherever you'd previously shared the old URL: email signatures, Google Business, social bios, etc.
A lead came in but I didn't get a notification
Lead notifications come via email to account owners and admins. Check spam — there are no admin-side notification settings to toggle today.
I want to disable the website temporarily
Uncheck Enable website in the Publishing card and save. The public page still shows but the Request a Quote button disappears. Re-check it to bring leads back on.
I want to take the website down entirely
Uncheck Public listing and Enable website both, and save. The website URL returns a Not found page. Your settings are preserved — re-enable any time.
Where to find it
- Admin path: Admin → Website
- Who can edit: account owners and admins
- Public URL pattern:
fabwise.app/shop/your-slug - Quote form URL:
fabwise.app/shop/your-slug/quote - Careers URL (if enabled):
fabwise.app/shop/your-slug/careers - Lead inbox: Admin → Leads
Related
- Set Up Your Careers Page — posting jobs, reviewing applications, and moving someone through to hire
- Managing Leads — what happens after a quote request arrives
- Company Settings — your brand colour, which every website theme picks up